How to colour drench a room
Advice from the experts
Colour drenching has emerged as one of the most influential approaches to decorating in luxury home interiors. Far more than just a trend, it is a deeply considered, immersive style that can transform a space in a way that no accent wall ever could. Thankfully, it’s a design technique that’s most definitely here to stay.
Here’s how to do it beautifully.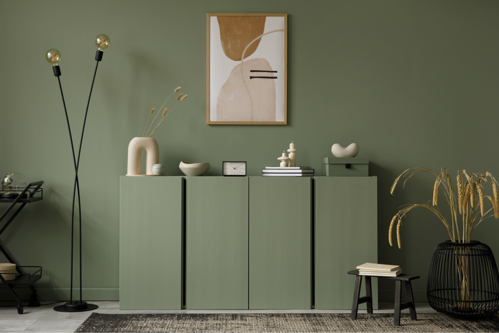
What does colour drench mean?
In basic terms, colour drenching is the technique of decorating all surfaces within a space using the same paint colour, or very similar tones of that same colour. This could include the walls, the skirting boards, the ceiling, the coving, and even furniture, shelving and radiator covers too.
Whereas traditional decorating often separates a space using white trim or contrasting colours, colour drenching produces a final finish that appears seamless and unified. After all, if you fall in love with a colour shade, why not use it everywhere?
Why colour drenching works
For those who appreciate architectural detail, interior cohesion and effortless elegance, colour drenching most definitely works.
One of the beauties of the end result of this style is that it creates a new visual perspective of your space: When the entire room follows exactly the same colour scheme, your eyes naturally pick up small details in architectural structure - curved lines, textures and subtle mouldings - that might otherwise be un-noticed.
In a smaller space, colour drenching can blur the lines - reducing harsh breaks that often leave a room feeling chopped in half. Instead, it offers fluidity and a space that appears roomier, harmonious, and more atmospheric. In a larger space, it can soften corners, add depth, and create an intimacy that big rooms often struggle to achieve.
Colour drenching can also have an effect on your mental wellness too. Being surrounded by a single colour can create a sense of focus and clarity, as well as influence your mood and emotions. A cocoon of warm neutral feels calming. Dark brown feels reassuring. And, light green feels awakening, for example.
Where can you colour drench?
Colour drenching is a really versatile technique, so it can be adopted in any room or space in your home. Although the mood created will very much depend on the colour chosen and the nature of the space, the seamless finish works almost anywhere.
Colour drenching works particularly well in spaces where there are striking architectural features, as well as spaces where visual cohesion is wanted. Period properties, for example Georgian, Victorian and Edwardian houses, tend to benefit especially well from the technique as they often feature sash windows, decorative cornices, ornate fireplaces and ceiling roses - all of which are beautifully highlighted when unified under a single, continuous colour.

How to Colour Drench: Step-by-Step Guide
So, now you know why to colour drench, here’s how to do it.
1. Choose Your Colour
The first step in the colour drenching process is to choose your shade.
Think about what kind of mood you want to create in the space - dark and moody, light and airy, wholesome and organic - and order a selection of colour samples to be delivered to your home.
Once you have your samples at home, try them out in different parts of the room and at different times of the day. Also, bear in mind that north-facing spaces tend to bring out the cooler tones of a shade, whereas south-facing rooms can generate more warmth.
If you’re looking for something bespoke, and already have a colour in mind that you love, you can create your own unique shade using our Love it. Match it. service.
Simply pop into your local B&Q with a swatch or sample of the colour you want to replicate, and walk away with your very own formula - ready to colour drench.
2. Preparation
As with all decorating tasks, the key is in the preparation.
Firstly, remove any furniture or accessories from the room that you are able to store elsewhere temporarily. Any remaining items will need to be protected using dust sheets, and protective floor coverings should be laid to reduce the risk of spillages and damage.
Then, add masking tape around windows, sockets, and anything else you want to keep paint-free.
If any surfaces are rough, bumpy, or scratched, sand them down using a sheet of sandpaper to ensure a smooth surface for a flawless application. Any larger scratches or holes in the wall will need to be filled using a suitable, high-quality wall filler.
Next, give your walls, ceilings, and any other surfaces you wish to paint a good clean. Wipe down with a damp cloth or sugar soap solution to remove dust and dirt, and then leave to dry fully.
3. Painting
Colour drenching your space is best done in three stages: Ceiling → Woodwork → Walls.
Ceiling
Painting a ceiling first will ensure that you won’t face any drips or splatters down your walls from above later on.
Start with an angled paint brush along the edges of the room, where the ceiling meets your wall or architrave. Paint in slow strokes to create clean lines.
Next, with your roller, work from one corner to the other in small sections using an M or W shape pattern to ensure the paint distributes evenly. Fill in the gaps without lifting the roller.
Once your first coat is complete, allow it to dry before applying a second coat using the same technique.
Woodwork
Once your ceiling is finished, move onto your doors and woodwork.
A high-quality angled paintbrush works well for cutting in around edges, corners, and handles or metalwork. A straight brush or mini roller is best for doors and larger areas of panelling.
Most woodwork will need two coats. Allow the first coat to dry fully before applying the second.
Walls
Now onto the walls.
As with the ceiling, use your angled brush to cut in along the edges first. Then fill the space with a roller using the same M or W technique.
Apply light strokes and overlap slightly to maintain even coverage. Leave the first coat to dry fully before applying the second.
After-care & Maintenance
When your colour drench is complete and you’re happy with the results, it’s time for a tidy up.
Rinse off any excess paint from your brushes and rollers in warm, soapy water, then leave them to air dry upright.
Remove dust sheets and protective coverings, and return your furniture and accessories to their positions.
Be sure to follow our Maintaining Clean Painted Walls Guide to maximise the longevity of your newly colour-drenched space.
Why Multi-Surface Dead-Flat Matt Paint Works Best
Achieving a beautifully colour-drenched space requires not only careful colour selection, but also the right finish.
Opting for a multi-surface paint ensures a seamless appearance across walls, ceilings, and woodwork, creating a unified and harmonious result.
A Dead-Flat Matt finish reduces glare, softens edges, and adds depth for a sophisticated, effortless look. It also helps the space absorb light rather than reflect it.
Colour drenching a bedroom
A place for intimacy and rest - a bedroom can especially benefit from the advantages of a colour drench.
Using the same, carefully chosen shade on your bedroom ceiling, walls and window sills can help to create a deeper sense of cocooning and cosiness in your space. Including your built-in wardrobes and shelving into the drench can also help to make the space feel tidy and uncluttered - allowing these storage essentials to blend in effortlessly.
Soft sage, warm taupe or dusky rose are colours to transform your space into one that’s calming and grounding, as well as luxurious.

Colour drenching a bathroom
An all-over drench of colour will offer your bathroom a refreshed, re-invigorated look.
Colour drenching in smaller bathrooms and downstairs toilets can feel particularly impactful, especially with a bold colour choice like a jewel green or a dark, spicy red.
For a softer, more spa-like approach, use a warm clay shade or earthy greige across walls, ceilings and cabinetry. Brushed brass or matt black fittings will enhance the luxurious feel alongside the painted surfaces.

Colour drenching a living room
In a space where single feature walls were once a huge trend, enveloping your living room with a single colour has become the more stylish option.
When your living room ceiling, walls and skirtings are cohesive, you have the opportunity to place more visual prominence on furniture, artwork and accessories. It also allows for a flowing, calming space to relax and spend time with your family and friends.
Shelving, media units and fireplaces should also be involved in the colour drench, to allow for full harmonious effect.
What are the best paint colours for colour drenching?
While personal preference and desired mood will play a lead role in your colour choices, we’ve noticed that certain paint colours consistently deliver exceptional results.
In general, muted shades tend to drench more elegantly than brights, preventing a space from feeling too overwhelming or acidic. Similarly, when you choose hues with warmth and depth, this can enhance the cocooning effect of the technique.
Warm Neutrals
Using a single warm neutral in your space is a classic, modest choice. Ideal for larger spaces, bedrooms, nurseries and contemporary living rooms, the luxury is all in the subtlety and finish.
Look for Cream Shade 3, Yellow Shade 1 and Grey Shade 3.


Terracotta Tones
A terracotta tone can transform a home into a warming, earthy, Med-inspired sanctuary. These hues work especially well alongside natural materials and accessories such as wood, linen, stone and wicker.
Look for Orange Shade 1 and Orange Shade 2.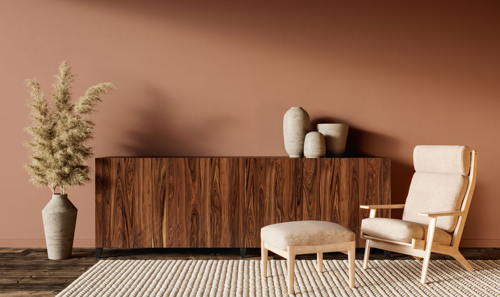
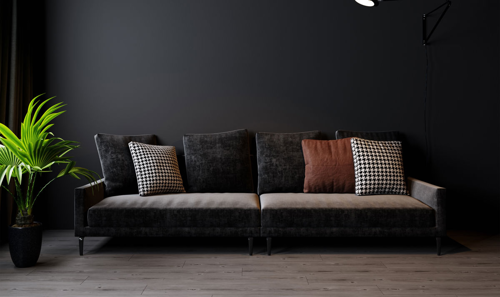
Luxurious Darks
A room steeped in a nightly shade can feel surprisingly calming and humble. Pair deep, dark and divine shades with antique brass, copper and dark wood furnishings for a sophisticated overall impression.
Look for Grey Shade 5, Black Shade 4 and Black Shade 3.


Pick your shade and get started!
Once you've done your research and committed to the vision, it’s time to get started - and our V&CO Dead-Flat Matt paint is the perfect partner for your project.
Offering you a flawless finish for every surface, it offers the seamless, velvety look you’ve been craving for your colour-drenched space.
Our clever peel & stick samples allow you to try our colours anywhere, in any light, without leaving a mark.